

Smoke Study Procedure: 7 Essential Steps for GMP Cleanroom Airflow Visualization
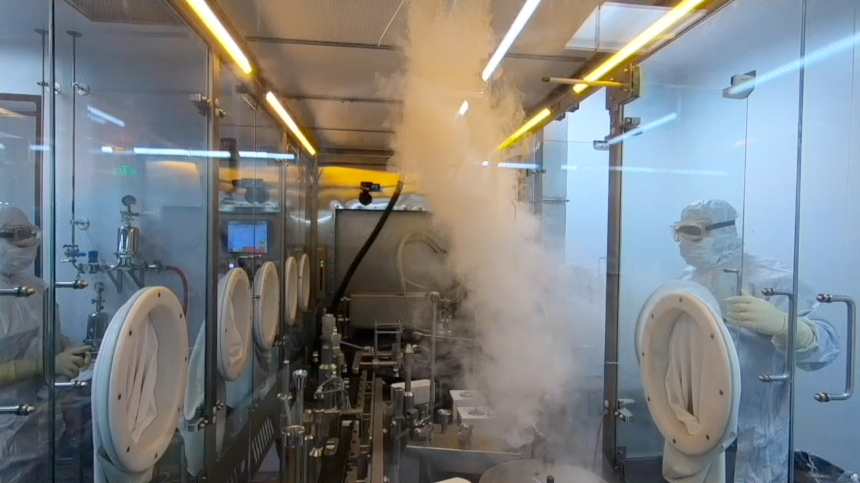
A smoke study procedure shows how air actually moves through a cleanroom, not simply how the design indicates it should. Done well, this airflow visualization study gives QA and validation teams visual evidence of whether airflow protects critical zones during aseptic processing.
What Is a Smoke Study?
A smoke study is a test that makes air movement visible, using a suitable fog or smoke, so teams can see airflow patterns in a cleanroom or unidirectional airflow zone. It is also called airflow visualization testing or a smoke visualization study. The visualization is video-recorded and evaluated against predefined criteria.
Why Airflow Visualization Matters in Pharmaceutical Cleanrooms
A smoke study helps visualize whether airflow provides the intended protection to exposed product, containers, and closures by demonstrating airflow direction and potential disruptions. Cleanroom Smoke Study Services can help organizations plan and evaluate these studies as part of their contamination control and validation activities. It also reveals turbulence or reversal that could carry contamination toward them.
Role of Cleanroom Airflow Visualization
Particle counts and velocity measurements provide important quantitative data, but they do not by themselves demonstrate the direction and behavior of airflow around critical operations. Cleanroom airflow visualization helps demonstrate how air behaves around critical operations. This connects smoke studies with first-air protection and contamination control: a room can meet its classification while airflow behavior around the exposed product still requires evaluation.
Static vs. Dynamic Smoke Study
A static smoke study is performed at rest, without people or activity, to show the baseline airflow. A dynamic smoke study is performed during simulated operations, with gowned operators, interventions, and equipment movement. The FDA Guidance for Industry, *Sterile Drug Products Produced by Aseptic Processing — Current Good Manufacturing Practice* (2004) and FDA sterile drug process inspection guidance emphasize dynamic airflow visualization to assess unidirectional airflow, turbulence, and the impact of interventions during aseptic operations. EU GMP Annex 1, Manufacture of Sterile Medicinal Products also addresses airflow visualization within qualification and contamination control expectations. The study design should reflect the process, equipment configuration, and risk assessment; where appropriate, both static and dynamic conditions may be evaluated.
When Is a Smoke Study Performed?
No source sets one universal frequency. Studies are typically performed at initial qualification and after changes that could affect airflow, such as HVAC modifications, HEPA filter changes, equipment relocation, or new interventions. Repeat frequency should follow your site's requalification program and contamination control strategy.
7 Essential Steps in a Smoke Study Procedure
Step 1 – Define the Study Objective
Decide what the study must answer: qualifying a new filling line, assessing a new intervention, or investigating a deviation. Define scope, locations, and interventions in a QA-approved protocol, because an unclear objective produces footage that cannot support a conclusion.
Step 2 – Review the Cleanroom and Airflow Design
Review layout drawings, HEPA filter positions, pressure differentials, and equipment placement. Consider equipment interfaces, operator positions, material movements, and routine interventions when defining the visualization locations.
Step 3 – Select Smoke Study Equipment
Smoke study equipment typically includes:
• A suitable smoke/fog generator with a qualified, neutrally buoyant visualization medium.
• A delivery tube or wand
• Video recording equipment and suitable lighting
• Location markers for reference
Justify the medium, confirm it is compatible with the cleanroom and equipment, and clean all equipment before it enters critical areas.
Step 4 – Establish Study Conditions
Record room classification, HVAC status, pressure differentials, equipment configuration, and personnel numbers. For dynamic studies, use trained operators and For dynamic studies, use trained operators and representative interventions based on routine operations and, where applicable, interventions represented in aseptic process simulations.
Step 5 – Perform Airflow Visualization
Release the medium at defined locations representing critical airflow paths, working heights, equipment interfaces, and aseptic interventions. Record from several angles while operators perform routine and corrective interventions and move materials.
What to Observe During Smoke Visualization
• Air direction and sweeping action over and away from exposed product
• Turbulence, eddies, or stagnant areas
• Reversal or backflow
• Air entering from lower-grade areas
• Time taken for the visualization medium to clear
Step 6 – Record and Evaluate the Results
Review the video against the protocol, noting time stamps, locations, and activities. An observation is what was seen; acceptability is judged against predefined criteria. QA, engineering, and aseptic operations should evaluate the footage together, since airflow behaviour around equipment and interventions often requires technical and process judgement.
Step 7 – Review Acceptance Criteria and Document Conclusions
Compare observations with the pre-approved criteria. Document conclusions, deviations, and corrective actions, and confirm the outcome through repeat visualization where the risk assessment supports it.
Smoke Study Acceptance Criteria
Smoke study acceptance criteria should be defined from the intended process, equipment configuration, critical areas, and the need to protect exposed product and components. They are site-specific and justified, not a universal checklist. Examples a study may demonstrate:
• Unidirectional flow is maintained across the critical zone
• Air moves over and away from exposed product
• No reversal or turbulence draws lower-grade air over the product
• Interventions do not compromise first-air protection, or flow recovers quickly
Smoke Study Example: A Practical Observation
Illustrative example: during a dynamic smoke study on a vial-filling line, the visualization medium moved downward and away from open vials. During a stopper-bowl refill, the operator's arm created an eddy that drew it toward the stoppering area. The observation would be documented and assessed for its potential impact on first-air protection. The investigation and risk assessment would then determine the appropriate corrective action and whether repeat airflow visualization is required.
Common Smoke Study Failures and What Happens Next
Unacceptable results often come from obstructions or equipment edges that create turbulent airflow, operator movement across open product, poor intervention technique, or inadequate filter coverage. Weak study design is another cause: static-only testing where the process demands more, unrepresentative interventions, or poor video. The response is to investigate, assess product risk, apply corrective action to the layout, technique, or HVAC balance as justified, and verify the fix.
Smoke Study Documentation and Reports
A report should include the protocol, acceptance criteria, equipment details, study conditions, labeled video, observations, deviations, and QA-approved conclusions. FDA inspection findings have identified inadequate smoke studies, including studies that did not adequately represent actual equipment configurations or aseptic interventions. Complete and representative records are therefore important for demonstrating that the study reflects actual operating conditions.
Conclusion
A smoke study procedure turns airflow assumptions into documented evidence. Plan it around the real process, evaluate observations against predefined criteria, and use risk assessment to guide the response. Done properly, airflow visualization provides valuable evidence for contamination control decisions.